I recently attended a photography workshop in Big Bend country. Specifically we met at Study Butte, right next door to Terlingua, TX. The dates for the workshop were selected to a period with the darkest skies, typically the time coinciding with a new moon. In mid-August, moonrise and moonset do not interfere with the rise of the Milky Way.
So some friends have asked “how do you take pictures of the Milky Way?” The first requirement is to find a place with very dark skies with minimal to no light pollution from anywhere. So the Big Bend area is considered one of the best, if not the best, areas in Texas to get very dark skies. In fact some sources have rated it as one of the five darkest spots in the US. Then the question is when to go to Big Bend. Our workshop leader selected mid-August, since the moon cycle was favorable and the Milky Way arises about 10 pm, and is alive for several hours. In the spring you will be up most of the night!
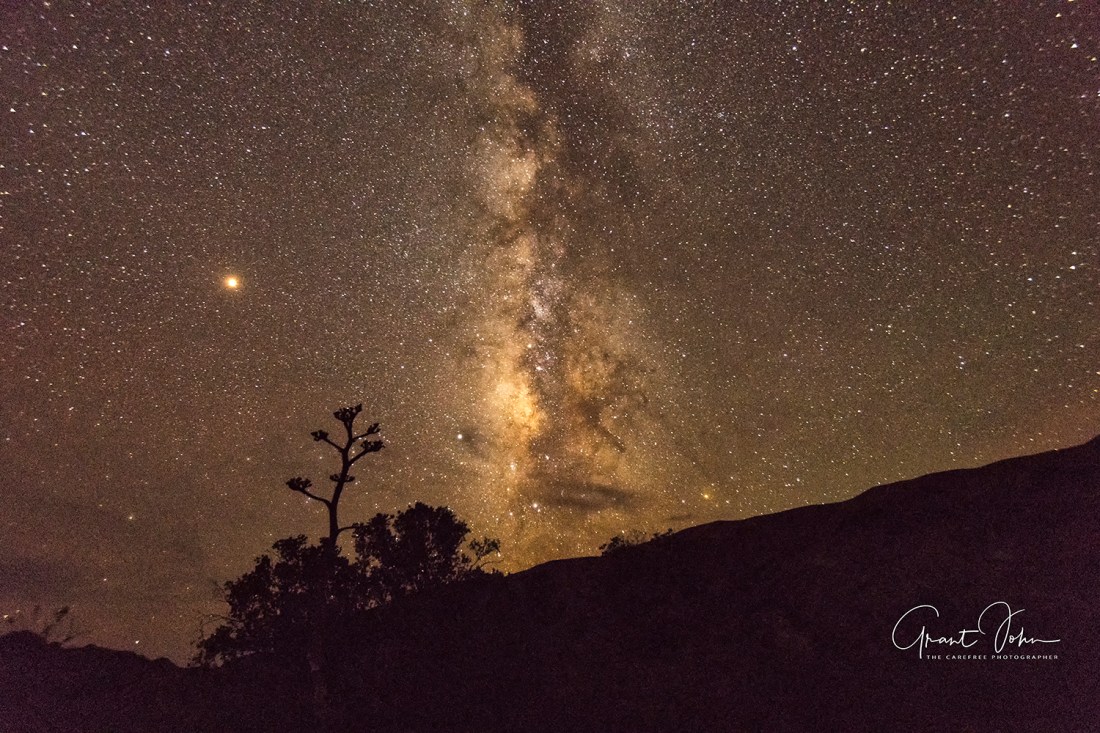
The next requirement is to find a place with an interesting foregound. Ideally the foreground supplies interest and perspective to the image. Our choices in Big Bend National Park included Castolon (buildings and old industrial equipment) and Sam Nail Ranch (old windmills, walls and sotol plants). At the right time the entrance to Santa Elena Canyon would work well, or Casa Grande at The Basin, or Balanced Rock. In Terlingua the Milky Way is often photographed at the cemetery in Ghost Town with crosses or monuments as a foreground. Old churches or ghost town buildings can work too.
What about the camera and lens? Ideally one needs an DSLR with manual settings, time expose capability and a wide range of settings. The lens should be as wide as possible and as fast as possible. A fixed lens in the 14-24 mm range would be best, especially with an f-stop of 2.8 or less. And one also needs a tripod.
Okay, we are in place with the appropriate equipment and at the right time. What about camera settings? Well, I took these images with a Nikon D850 and a 16-35 mm lens set at 16 mm. All were shot as RAW images. Most were taken with the camera in the vertical position, set on manual, focus at infinity (or just about), shutter in mirror lockup position and a remote shutter release attached to my camera. I had good results with 20 and 25 second exposures at f 4.0 (wide open for this lens) and ISO set at 6400. The noise at this ISO level with a Nikon is manageable. Others in the group had f 2.8 lenses and were able to shoot a little faster with a lower ISO setting, which reduces noise and star movement. The latter becomes quite noticeable at shutter speeds above 25 seconds. One individual had an f 1.8 lens and was able to capture beautiful images at 15 seconds and an ISO below 2000. Take test shots to check composition and exposure, and use your histogram to set the latter.


What about post-processing? I normally use Adobe Camera Raw, but Lightroom works well too. Some processing is also usually done in Photoshop. I normally first adjust white and black sliders to idealize the histogram. Then I adjust highlights and shadows to satisfy my eye. Typically I will add 10-20% to clarity, 10-15% to vibrance and 5-10% to saturation. After I open the image I will also denoise, dehaze, sharpen and resize. Trial and error with lead your way to outstanding Milky Way pictures. Good shooting!


